Treating Simple Ankle Sprains

Treating simple ankle sprains should be within everyone’s reach. Understanding the mechanics behind the problem is helpful. You can read my previous article on why we sprain our ankles.
In this article, I will advise you on the following:
- Recognition
- First Aid Treatment
- Using medication
- Rehabilitation & Follow Up care
- Exercises & Actions
Find more articles on my website from my ankle series
1 – Recognition
Your foot and ankle will suddenly no longer be stable and it will ‘give way’. When we are young we can recover without falling. As we age falls are more likely to cause injury. Head injuries should always receive medical assessment. Check out my article for the elderly; the elderly and what we all need to know.
Mechanism
You will try to place your foot on the ground and find it won’t take the weight without hurting. As you try to walk the pain stops you taking weight through the foot. Most of us find with minor sprains that the ligament is strained and recovers within 20-30 minutes after which weight bearing can start over. The joint sensors take a while to reset. Watch out for swelling and stiffness. A foot that cannot take weight for more than 24 hours and swells should be medically examined. X-rays are not always necessary or relevant. Compare both ankles, assuming only one was affected at the time of injury. For injuries that arise with sport as a result of impact, then assume more damage has arisen.
Signs
- DO the ankles look different in size and shape?
- DO the bulbous bits either side of the ankle look different?
- DO you have pain above the ankle at point A or B
- DO you have pain along the outside of the foot? At point C
- HAVE you lost all movement by 24 hours?
- CAN you take full weight on the foot at 24 hours after injury?
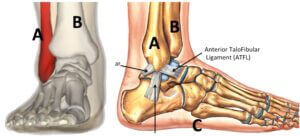
Ankle locations: Adapted illustrations. (Left) Wikipedia and (Right) FootEducation.com accessed 4.12.20
Bruising
Look at the picture below showing a notable ankle sprain with bruises. Bruises can extend all over the foot and tend to gravitate below and around the main site of the injury. Bruising is not a clear indicator of severe injury but it does show that small blood vessels have been damaged. Swelling, lack of movement, and an inability to put the foot to the ground after 12 hours is an indicator that further advice is necessary.

Swelling and footwear
Don’t try and put a shoe on in the early stages if you are at home. If you are out in the country, DO loosen your shoe laces until you can find somewhere to treat the foot. You will find trying to put the shoe or boot back on is not possible without creating further pain.
2 – First aid Treatment
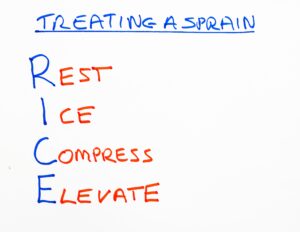
- Rest means not taking weight until the immediate swelling reduces.
- Icing helps with swelling and reduces nerve activity and pain.
- Compression supports the ankle, reduces swelling, and allows for earlier weight bearing.
- Elevation involves bringing the leg and ankle to the waist. If there is more pain, raise them above the waist. This reduces pain and helps to bring the swelling down.
How long to recover?
As humans, we are impatient to get better. The body starts to repair quickly, but this does not mean we should ignore our injuries. Initially, wait to see if weight can be taken on the foot and ankle. If recovery is quick, consider whether you should carry on with your activity. If you cannot take the weight, return to a place where you can remove the shoe and start the RICE regime. A notable sprain is when you cannot walk on the ankle after an hour. These sprains will take at least 3-6 weeks to make a recovery. Complete rest is required for 1-2 days after a notable sprain with walking aids. Recovery may take longer to return to full activity. Incomplete tears might be suspected if the ankle continually swells after returning to activity. Symptoms continue. Repetitive falls can lead to complete tears. These will need investigation and, in some cases, surgical repair.
LIGAMENTS. A pulled ligament recovers fastest. Torn fibres take longer, and complete rupture takes months. The idea behind support is to allow the ends to heal in close proximity. If the ligament separates, more scarring will arise, and this can cause nerves to become glued up in the repair mess, causing stiffness. Long-standing pain can arise from trapped nerves in this glue, the glue being scar material.
3 – Using medications
Ice will help with swelling. As shown above, you can apply it in a special bag filled with ice. You can also wrap ice cubes in a plastic bag and thin towel and apply them to the ankle. Use this every 2 hours for 20 minutes.
Fragile skin in older patients when ice should be used for shorter periods or not at all. It’s better to have swelling than problems with frostbite!
Arnica, a cream, may help with bruising. Anti-inflammatories can help with pain and swelling but should only be used for 2-3 days without seeking medical advice*. Straightforward pain can be assisted with paracetamol. Pain management should be used while the ankle hurts without walking. Once you can weigh bear, try not to rely on tablets by mouth. Creams are helpful to help the skin retain a supple texture. Massage the fluid upwards toward the knee to assist in reducing swelling. The use of anti-inflammatory gels may help with swelling and inflammation. Never apply creams or gels to open wounds.
Medical advice means any person registered to provide health care. Health professionals are trained in medical subjects. First-line caregivers include podiatrists, physiotherapists, osteopaths, and chiropractors, as well as traditional medical physicians.
4 – Rehabilitation and follow-up care
Support and rehabilitation are important. There are two principles behind management: return to exercise and support the ankle while continuing to use the foot and ankle. Speak to any physiotherapist, and they will tell you wrapping everything up for too long is not a good treatment strategy. Binding a joint up for lengthy periods will cause deterioration. Joints need to move to stay healthy, but exercises must be carried out proportionally. This means recovery is slower where the damage is greater.
Swelling may remain for many months, and based on the severity of the condition, some people may always have permanent swelling; ligaments may be stretched, torn, or ruptured (see diagram above).
On recovery – further assessment is required.
Assuming your ankle is now more comfortable after first aid, we need to return to sensible activity. Where a support is selected, an elasticated sewn-together figure of eight or an ankle brace can be of value. Larger pharmacy outlets, sports shops, and online sites will provide a range of products, usually from £10 upwards. It should be compressive and the sides reinforced, especially on the side of the damaged tissue.
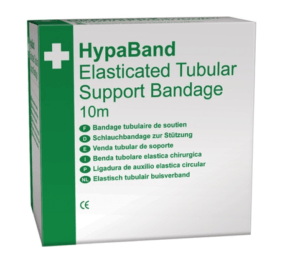 You can apply a simple elasticated Tubigrip sleeve over the foot and extend it up to the knee. For more compression, you may need to double this. Always check the toes for good circulation. The skin should be pink, and if you press the ends of the toes, the dimpled white colour should return pink fast. The use of 2 crutches or walking sticks helps you walk safely while you recover. Walking poles for recreational rambling are equally helpful.
 First line care
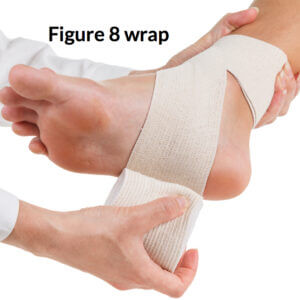
This comes down to RICEand an elasticated support. Where the swelling is moderate and activity is required, a Figure 8 wrap bandage is more effective than Tubigrip. The position is shown in the illustration. I have used a YouTube film here to assist you in applying the elasticated bandage (3 in / 75mm). The name ACE is just the make of the bandage so any elastic material will work.
The film is well made and clearly spoken lasting just over 3 minutes. Some films show bandages with more turns and extending up the leg. The Figure 8 should take the tension off the lateral (outside) ankle to allow ligaments to rest and repair. Bandages allow modest weight initially. They may be continued for some weeks after injury to give the ankle confidence. Early use of exercise to strengthen the tissues should be instigated when the ankle is shown to be healing. There should be no bruising present, and swelling should appear as a mild enlargement only at this stage. Swelling can remain for many months and is not necessarily a concern.
Massage
Massage the ankle daily to help with fluid return and support venous blood flow and lymphatics. The lymphatic system is at the heart of the immune fighting system but also acts as extra drainage. The recycling centres (lymph glands) are found at the back of the knees and groin in the leg and the armpit in the area.
There is nothing difficult. Do this yourself or seek help from a second party. It is best to sit or lie down. Use something like a regular foot cream that you can rub into the skin. Start massaging around the ankle with two fingers. Rotate the fingers, applying more cream or lotion that will not sit on the surface.
Apply the rotation in both clockwise and anti-clockwise directions. Then, push down as hard as you can in a brush stroke under the fibular bone in each direction of the ligament. This desensitises the nerves, making them less tender and bringing fresh blood to the area. We are creating an inflammatory response with rubbing to increase small blood vessel activity.
5 – Exercises and actions
Build up walking distance on flat surfaces to start with, then venture onto less even ground after some exercises. The wobbleboard is excellent for this. Dare I say these can be found on the internet for under £10? You can always pay for bigger, brighter and stronger. Hopefully, you will only be using the exercise board for a short period. Do note that I have not given any consideration to age and or a sense of normal stability when moving. Age is not always a guide to being stable.
Wobble Board

Of course, there are always downsides to the wobble board. You can fall off and injure yourself, so having support like the back of the chair makes sense when starting. The air wobble sac shown is an alternative method. Again, it is available on the internet.
The nerves form part of the reflex system. This system makes automatic adjustments as we move. We have nerves in tendons and joints called proprioceptors. Constant feedback is like data telling our brain what position we have adopted and whether we are on the ground or in the air. The wobble board resets this information by retraining the reflex at a time when ligaments are in repair mode. You don’t have to use a wobbleboard, but if you want the best recovery, this makes sense. Alternatively, go to a registered physiotherapist for advice rather than your GP. Start this exercise using a wobble system no earlier than 2 weeks.
Of course, there are other techniques, such as Thera-band, which can be used for exercises to strengthen both tendons and ligaments. The method can improve your reflexes, thus protecting your ankle joint. This helps tension the ligaments, so they know they have to go back to work to restore ankle stability. Again, this takes weeks, NOT days!
Theraband
Thera-band exercises can use the resistance within the material. In this short YouTube video from a New Zealand practice, the technique is simple: a piece of furniture and a regular seat are used to fasten the band (click for film). Start this from 7 days onwards, but only gently to start with.
In case you were wondering what to use,
Therabands come in a variety of strengths, from yellow, the lightest resistance, to the black-coloured band, offering the heaviest resistance. You do not have to keep buying new colours, though, as you can tie the band to make it more or less slack. For a more strenuous workout, use a thicker band, add more bands or stretch the band more. Perform the same exercise for strength with a heavy band or for endurance and conditioning with a light band.
Alphabet
Other exercises include the alphabet. This is carried out sitting or lying down and entails moving the ankle around to make the shapes of letters. You make an A, then a B and so on until you complete all 26 letters of the English alphabet.
Tip-toe (probably at 3+ weeks)
As the foot goes onto the toes and the heel comes off the ground, we test our balance. Start off by using the back of a chair to support yourself and avoid falling suddenly. As you go up, you will invert both your ankles. This is a big test now to see if you can take that load. If not, stop and keep up exercises that don’t hurt. Make sure you make a good recovery without bruising before using the tip-toe method. You can opt to work on the damaged ankle in time. Once this works, sit down and try walking on tip-toe with both feet.
In Summary
Sprains are common, and recovery can be quick. Adequate first aid can prevent longer-term problems from arising. Damage that includes tears to the lateral ligaments may need repair later and will take longer to recover. This article helps you to make decisions about when to seek medical help. Remember, x-rays are not always required for ankle sprains.
Other articles on ankles
Thank you for reading this article ‘Treating Simple Ankle Sprains’ by David R Tollafield
Published by Busypencilcase Reflective Communications
Est 2015

For ConsultingFootPain
Published 27 December 2020. Modified January 2025

Recent Comments